Programming your Chamberlain garage door opener wall button can seem daunting, but with the right guidance, it becomes a straightforward task that ensures seamless and secure access to your garage. This guide provides all the necessary steps and tips for setting up, adding, or reprogramming a wall button, enhancing both convenience and security. Imagine never worrying about whether you left the garage door open or dealing with a malfunctioning button. By taking a few minutes to program your wall button correctly, you can enjoy peace of mind and easy control of your garage door.
In this guide, we’ll walk you through the entire process step-by-step. We’ll start by helping you identify and locate the learn button on your garage door opener, a critical component in the programming process. Then, we’ll guide you through the programming steps, ensuring you understand each action you need to take. We’ll also cover common troubleshooting issues and how to resolve them quickly. By the end, you’ll have a fully functional wall button that works perfectly every time, whether you’re a seasoned DIY enthusiast or a complete novice. Ready to get started? Read on to learn the precise steps and tips for successful programming!

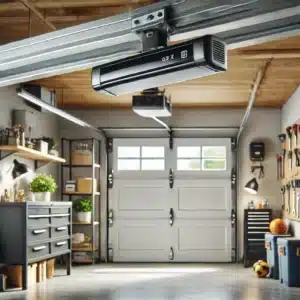
Understanding Your Chamberlain Garage Door Opener
Before diving into the programming process, it’s essential to have a good understanding of your Chamberlain garage door opener and the different types of wall buttons available. This foundational knowledge will help ensure that you program your wall button correctly and safely.
Types of Wall Buttons
Chamberlain offers a variety of wall buttons, each designed to cater to different needs and preferences. Here are some common types:
- Basic Wall Button: This is the most straightforward option, providing simple open and close functionality. It’s perfect for those who want a no-fuss solution.
- Motion-Detecting Wall Button: This model includes a motion sensor that automatically turns on the garage lights when it detects movement. It’s a great choice for those who frequently enter and exit the garage in the dark.
- Multi-Function Wall Button: This advanced option offers additional features like a timer-to-close function, which automatically closes the garage door after a set period. Some models also include a lock feature to disable the remote controls for added security.
- Wireless Wall Button: This model operates without wires, offering more flexibility in placement. It’s ideal for those who want a cleaner installation without visible wiring.
Understanding the features of your specific wall button model will help you follow the programming instructions more accurately.
Safety Precautions
Safety should always be a top priority when working with your garage door opener. Here are some important safety tips to keep in mind before you start the programming process:
- Disconnect Power: Before beginning any work, ensure the garage door opener is disconnected from power. This prevents accidental activation, which could cause injury or damage.
- Read the Manual: Familiarize yourself with the user manual for your specific garage door opener model. It contains vital information on safety warnings and instructions tailored to your device.
- Ensure Proper Lighting: Make sure your work area is well-lit. This helps you see all components clearly and reduces the risk of mistakes.
- Use a Stable Ladder: If you need to reach the garage door opener, use a stable, non-slip ladder. Ensure it is positioned securely before climbing.
- Keep Children and Pets Away: Make sure children and pets are not in the garage while you’re working. The moving parts of a garage door opener can pose a significant risk.
Tools Needed
Having the right tools on hand will make the programming process smoother and more efficient. Here’s a list of tools and equipment you’ll need:
- Ladder: A sturdy ladder is necessary to reach the garage door opener unit, especially if it’s mounted on the ceiling.
- Small Screwdriver: Some models may have a light lens cover or a protective cover over the learn button, which requires a screwdriver to remove.
- User Manual: Keep the user manual nearby for reference. It contains specific instructions and troubleshooting tips for your model.
- Flashlight: If your garage isn’t well-lit, a flashlight can help you see the components clearly.
- Battery (if applicable): Some wall buttons require batteries. Make sure you have the correct type and a spare on hand.
By understanding the different types of wall buttons, adhering to safety precautions, and gathering the necessary tools, you’ll be well-prepared to program your Chamberlain garage door opener wall button efficiently and safely.
Initial Setup
Before you can program your Chamberlain garage door opener wall button, it’s crucial to complete the initial setup. This involves locating the learn button and ensuring that your garage door opener has power and is functioning correctly. Let’s walk through these steps in detail.
Locate the Learn Button
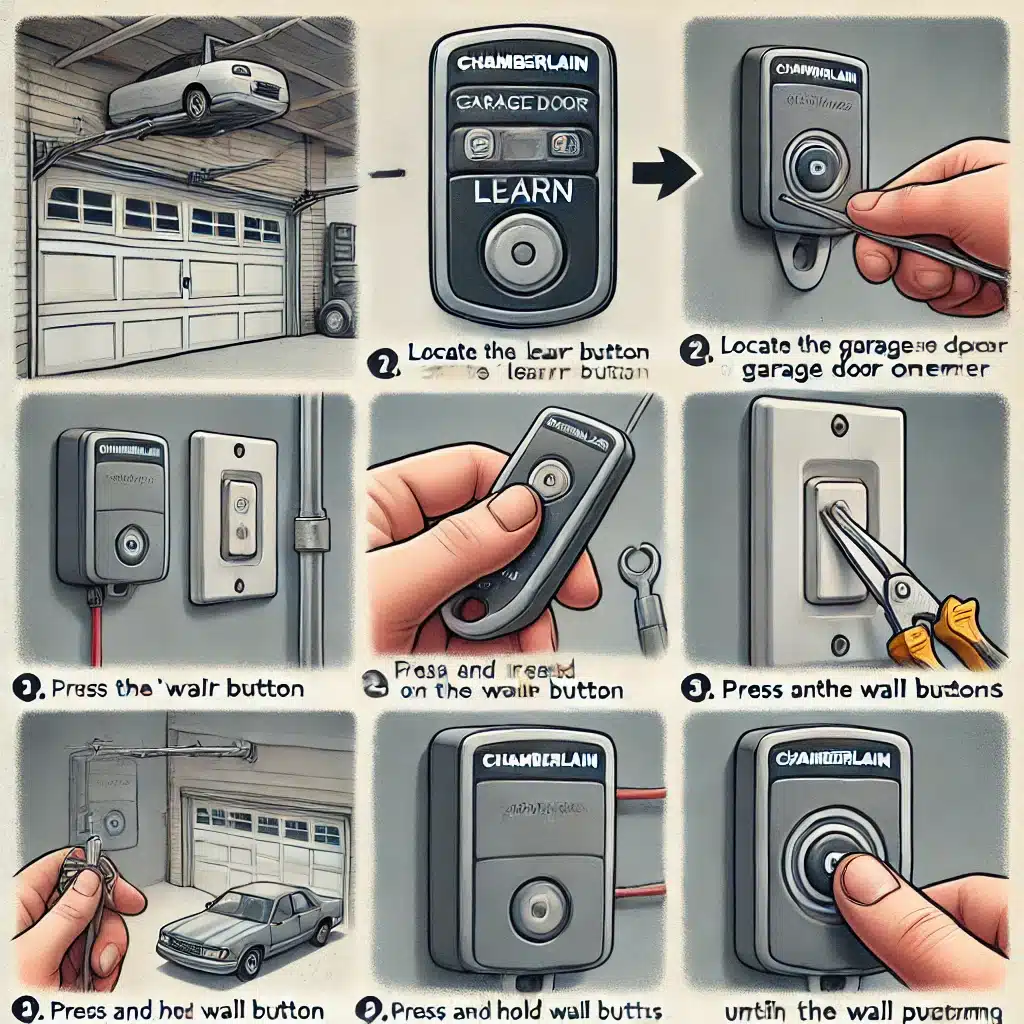
The learn button is a key component in the programming process of your Chamberlain garage door opener. Here’s how to find it:
- Access the Garage Door Opener Unit: Start by locating the main garage door opener unit, which is typically mounted on the ceiling of your garage.
- Identify the Type of Opener: Depending on the model, the learn button might be located in different places. Generally, it can be found near the antenna wire or on the back or side of the motor unit.
- Remove the Light Lens Cover (if applicable): On some models, the learn button is hidden behind a light lens cover. If this is the case, you’ll need to remove the cover. This is usually done by gently pulling it off or unscrewing a few screws with a small screwdriver.
- Look for the Learn Button: The learn button is often a small, square button and can be colored red, green, purple, or yellow depending on the model. It is usually labeled as “Learn” or has an icon that looks like a remote control.
- Check the User Manual: If you’re having trouble locating the learn button, refer to your user manual. It will have detailed diagrams and instructions specific to your model.
By finding the learn button, you’re now ready to move on to the next step in the initial setup.
Power Check
Ensuring your garage door opener has power and is functioning correctly is essential before programming the wall button. Here’s how to perform a power check:
Reconnect the Power: Plug the garage door opener back into the electrical outlet if previously disconnected for safety.
Check the Indicator Lights: Most Chamberlain garage door openers have indicator lights on the main unit. These should be steady or blinking to show the unit is operational.
Test the Opener with the Remote Control: Use your existing remote to open and close the garage door. If the door responds, you can proceed with programming the wall button.
Inspect the Power Source: If there’s no response, ensure the outlet works by plugging in another device and check the circuit breaker or fuse box for any issues.
Listen for the Motor: Activate the opener and listen for the motor sound to determine if the opener is receiving power but has a mechanical issue.
Check for Obstructions: Ensure there are no objects blocking the garage door’s path, as obstructions can prevent proper operation.
By thoroughly checking that your garage door opener has power and is functioning, you can avoid potential issues during the programming process. With the learn button located and power status confirmed, you’re ready to program your Chamberlain garage door opener wall button.

Programming the Wall Button
Now that you’ve located the learn button and ensured your garage door opener is powered and functioning, it’s time to program your Chamberlain garage door opener wall button. Follow these step-by-step instructions to successfully sync your wall button with the opener. If you encounter any issues, the troubleshooting section will help you resolve them.
Step-by-Step Instructions
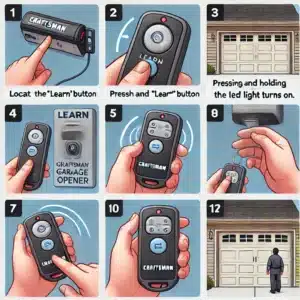
- Press the Learn Button
- Locate the Learn Button: As discussed in the initial setup, the Learn button is typically on the back or side of the motor unit. Ensure you have clear access to it.
- Press and Hold: Firmly press and hold the learn button until the LED light next to it begins to blink. The blinking light indicates that the garage door opener is in programming mode. The duration you need to hold the button varies by model, but it’s usually around 6 seconds. If you accidentally release the button too soon, simply press and hold it again.
- Locate the Learn Button: As discussed in the initial setup, the Learn button is typically on the back or side of the motor unit. Ensure you have clear access to it.
- Activate the Wall Button
- Press the Wall Button: Within 30 seconds of activating the learn button, go to your wall button and press it. Depending on your model, you may need to press and hold it until you hear a click from the garage door opener or see the LED light on the opener stop blinking and turn solid, indicating a successful sync.
- Multiple Wall Buttons: If you are programming multiple wall buttons, repeat this process for each one. You must press the learn button on the opener and then activate each wall button within 30 seconds of pressing the learn button.
- Press the Wall Button: Within 30 seconds of activating the learn button, go to your wall button and press it. Depending on your model, you may need to press and hold it until you hear a click from the garage door opener or see the LED light on the opener stop blinking and turn solid, indicating a successful sync.
- Test the Connection
- Initial Test: After programming, test the wall button by pressing it to open and close the garage door. Stand clear of the door’s path to avoid any accidents.
- Functional Check: Ensure the garage door responds promptly to the wall button commands. Test it a few times to confirm consistent performance.
- Secondary Features: If your wall button has additional features like a light switch or motion detector, test these functionalities as well to ensure they are working as expected.
- Initial Test: After programming, test the wall button by pressing it to open and close the garage door. Stand clear of the door’s path to avoid any accidents.
By following these steps, you should be able to program your wall button easily. However, if you run into any issues, the troubleshooting section below should help you address them.
Maintenance Tips
To ensure your Chamberlain garage door opener and wall button operate smoothly and reliably, regular maintenance is key. This section will cover essential maintenance tips, including regular testing, battery replacement, and keeping the system up-to-date with software updates.
Regular Testing
Regular testing of your wall button and garage door opener is crucial to ensure they continue to function correctly and safely.
- Monthly Checks:
- Test the Wall Button: Press the wall button to open and close the garage door. Observe the door’s movement to ensure it operates smoothly and without hesitation.
- Safety Reversal System: Test the safety reversal system monthly. Place an object, such as a block of wood, in the door’s path. Close the door using the wall button. The door should reverse when it contacts the object. If it doesn’t, consult the user manual for adjustment instructions or contact a professional for service.
- Test the Wall Button: Press the wall button to open and close the garage door. Observe the door’s movement to ensure it operates smoothly and without hesitation.
- Listen and Observe:
- No Unusual Noises: Listen for any unusual noises during operation, such as grinding or squeaking, which could indicate mechanical issues.
- Smooth Operation: Ensure the door opens and closes smoothly without jerking or stalling.
- No Unusual Noises: Listen for any unusual noises during operation, such as grinding or squeaking, which could indicate mechanical issues.
- Check the LED Indicators:
- Status Lights: Check the status lights on the garage door opener and wall button for any error codes or warnings. Refer to the user manual for decoding these indicators.
- Status Lights: Check the status lights on the garage door opener and wall button for any error codes or warnings. Refer to the user manual for decoding these indicators.
Regular testing helps identify potential issues early, allowing for timely maintenance and preventing unexpected failures.
Battery Replacement
If your wall button or remote control uses batteries, replacing them regularly is essential to maintain reliable operation.
- Battery Life:
- Typical Lifespan: Most wall button and remote control batteries last between 1-2 years, depending on usage. However, it’s good practice to check them every six months.
- Low Battery Indicators: Some wall buttons and remotes have LED indicators that signal low battery. Pay attention to these warnings and replace batteries promptly.
- Typical Lifespan: Most wall button and remote control batteries last between 1-2 years, depending on usage. However, it’s good practice to check them every six months.
- Replacing the Battery:
- Access the Battery Compartment: Open the battery compartment on the wall button or remote control. This usually involves sliding off the cover or removing a screw.
- Remove the Old Battery: Carefully remove the old battery. Note the orientation (positive and negative ends) before removing it.
- Install the New Battery: Insert the new battery, ensuring the correct orientation. Use the type of battery specified in the user manual.
- Secure the Cover: Replace the battery compartment cover and ensure it’s securely in place.
- Access the Battery Compartment: Open the battery compartment on the wall button or remote control. This usually involves sliding off the cover or removing a screw.
- Testing After Replacement:
- Function Check: Test the wall button or remote control after replacing the battery to ensure it’s working correctly.
- Function Check: Test the wall button or remote control after replacing the battery to ensure it’s working correctly.
Regular battery replacement ensures that your wall button and remote controls are always ready for use, preventing inconvenience and maintaining security.
Software Updates
Keeping your new garage door opener system up-to-date with the latest firmware and software updates is important for optimal performance and security.
- Why Updates Matter:
- Enhanced Features: Software updates often include new features or improvements to existing ones, enhancing your system’s functionality.
- Bug Fixes: Updates can fix bugs or issues identified in previous versions, improving reliability.
- Security Improvements: Firmware updates can enhance security, protecting your system from potential vulnerabilities.
- Enhanced Features: Software updates often include new features or improvements to existing ones, enhancing your system’s functionality.
- Checking for Updates:
- Manufacturer’s Website: Regularly visit the Chamberlain website or the specific support page for your garage door opener model to check for firmware updates.
- MyQ App: If your opener is connected to the MyQ app, the app will notify you of available updates. Follow the in-app instructions to download and install updates.
- Manufacturer’s Website: Regularly visit the Chamberlain website or the specific support page for your garage door opener model to check for firmware updates.
- Installing Updates:
- Download Instructions: Download the firmware update file from the manufacturer’s website. Follow the provided instructions, which may include transferring the file to a USB drive and connecting it to your opener.
- MyQ Integration: If using the MyQ app, the update process is typically straightforward. Ensure your opener is connected to Wi-Fi, and follow the app’s prompts to complete the update.
- Download Instructions: Download the firmware update file from the manufacturer’s website. Follow the provided instructions, which may include transferring the file to a USB drive and connecting it to your opener.
- Post-Update Check:
- Test the System: After updating, test the garage door opener and wall button to ensure everything is functioning correctly. Look for any new features or settings that may have been added.
- Test the System: After updating, test the garage door opener and wall button to ensure everything is functioning correctly. Look for any new features or settings that may have been added.
By keeping your system’s software up-to-date, you can enjoy the latest features, improved performance, and enhanced security, ensuring your garage door opener continues to serve you reliably.
In summary, regular testing, timely battery replacement, and staying current with software updates are essential maintenance practices for your Chamberlain garage door opener and wall button. These steps will help ensure your system remains reliable, safe, and efficient for years to come.

Frequently Asked Questions
Here are answers to some common questions about programming and maintaining your Chamberlain garage door opener wall button:
What should I do if my wall button doesn’t program correctly?
Ensure you are pressing the learn button correctly and check for any obstructions that might interfere with the signal. Make sure to follow the programming steps precisely as outlined in the user manual.
Can I program more than one wall button to a single garage door opener?
Yes, you can program multiple wall buttons to the same garage door opener. Simply follow the programming steps for each additional button within the specified timeframe after pressing the learn button.
How often should I test my garage door opener wall button?
It’s recommended to test your garage door opener wall button at least once a month. Regular testing helps ensure that it operates correctly and allows you to identify any potential issues early.
What if my wall button stops working suddenly?
First, check the power supply to the garage door opener and ensure all connections are secure. If the problem persists, consult the troubleshooting section in your user manual for further assistance.
Can I reset my garage door opener if I make a mistake during programming?
Yes, you can reset your garage door opener to its factory settings if needed. Refer to the user manual for specific instructions on how to perform a reset.
Conclusion
Programming and maintaining your Chamberlain garage door opener wall button is crucial for smooth and reliable operation. By following the steps outlined in this guide, you can ensure your garage door opener functions optimally, providing secure access to your home. We covered the initial setup, programming steps, additional features like wireless keypads, and essential maintenance tips such as regular testing, battery replacement, and software updates.
A properly programmed wall button enhances convenience and improves home security. By taking the time to set up and maintain your garage door opener system, you invest in its long-term reliability and functionality. Take action today to program or maintain your Chamberlain garage door opener wall button, and if you encounter any challenges with garage door repair, refer to this guide or consult the user manual. Your efforts will ensure smooth operation and peace of mind every time you use your garage door opener.